A Beginner's Guide to Integrating Thermal Printer Mechanisms into Embedded Systems

Integrating a thermal printer mechanism into your embedded system might sound simple at first—until you actually start doing it. Power ratings, communication protocols, paper path design, cutter options... all of a sudden, things get a bit more complicated. Whether you're designing a kiosk, vending machine, or any other embedded device, the success of your printing function hinges on thoughtful integration.
This printer integration guide shows you how to integrate thermal printer mechanisms into embedded systems, especially if you're new to the process. It covers hardware, software, power, layout, and shares lessons from real-world applications.
What Is a Thermal Printer Mechanism?
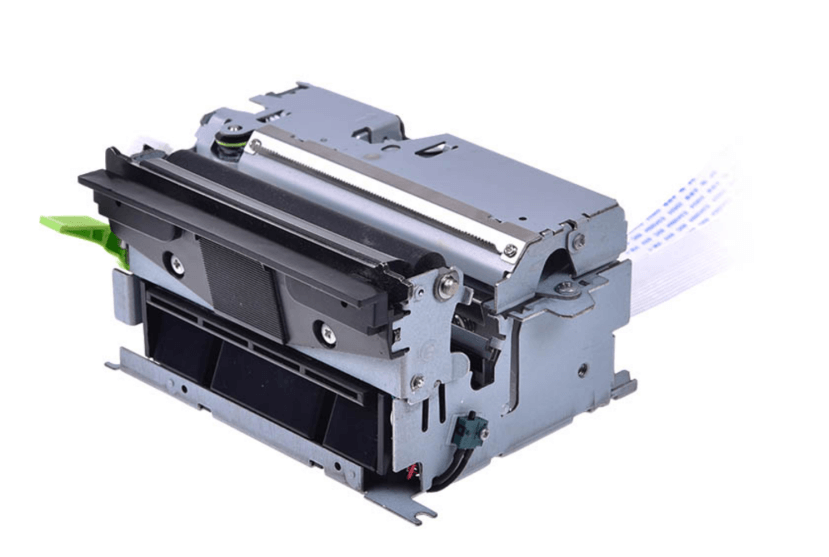
Before diving into integration, let's be clear on what you're working with. It’s not a complete printer—it’s the core printing unit, typically made up of a thermal printhead, motor, platen roller, sensors, and a mounting frame. It usually doesn’t come with an interface board, control logic, or housing.
In short, a thermal printer mechanism is designed to be embedded into your device—whether it’s for printing receipts, labels, or tickets. Not plug-and-play, but powerful when properly integrated.
Step-by-Step: How to Integrate a Thermal Printer Mechanism
✅ Step 1: Choose the Right Model for Your Device
Start with the basics: size, paper width, voltage, print speed, and mounting type. Need to print 58mm receipts in a compact handheld terminal? A 2 inch thermal printer mechanism is likely your best bet. Building a full-size kiosk? Go with a 3 inch model with auto cutter.
Double-check:
●Voltage and current requirements (typically 5V or 24V)
●Print width and DPI
●Paper thickness compatibility
●Supported sensors (paper out, head up, temp)
✅ Step 2: Design the Mounting Structure
This part is often underestimated. Your embedded system needs a stable, vibration-resistant mount for the printer. Also, consider:
●Easy access for paper loading
●Maintenance access for the cutter integration (if any)
●Ventilation if you're in a high-duty cycle scenario
Don’t forget: the platen and printhead must stay aligned. A skewed paper path causes jams and wear.
✅ Step 3: Wire the Electronics Correctly
Most thermal printer mechanisms connect to a control board via FFC/FPC cable or solder pads. Here’s what to watch for:
●Power supply ripple: thermal heads are sensitive
●Logic level compatibility (3.3V vs 5V)
●Grounding: avoid floating grounds to prevent interference
●Motor driver: some mechanisms require an external driver IC
Pro tip: use proper cable routing to reduce EMI issues, especially in noisy environments.
✅ Step 4: Integrate the Control Interface
Because mechanisms don’t include a communication interface (like USB or RS232), you’ll need a printer controller board or microcontroller (MCU) with the right firmware.
Things to consider:
●Print language support (ESC/POS, CPCL, custom commands)
●Memory buffer size for spooling
●Thermal management logic (heating time, rest cycles)
●Flow control for high-speed printing
If you're unsure, go with a thermal printer module instead. It’s pre-integrated with interface boards and saves time—but at the cost of flexibility.
✅ Step 5: Plan for Paper Handling
Yes, paper matters more than you think. Choose thermal paper rolls that match your mechanism's specs, and design the path so it loads smoothly.
Tips:
●Add paper guides to prevent skewing
●Include tension control to avoid feed issues
●If using labels, check for gap/black mark sensor support
●Decide early if you need a cutter or tear bar
Common Thermal Printer Mechanism Integration Mistakes to Avoid
●Forgetting to add a buffer capacitor near the printhead power pin
●Overheating due to enclosed mounts with no ventilation
●Mounting screws interfering with the paper feed
●Software not managing print head rest time, leading to fading
●EMI from nearby motors or RF modules corrupting print data
These issues seem small until you're deep into field testing. Plan ahead.
Final Thoughts
When done right, a thermal printer mechanism becomes a seamless part of your product. It prints quietly, fast, and reliably. But it takes more than plug-and-play—attention to power, layout, and firmware all matter.
If you're unsure about specifications or facing design challenges, consider working with suppliers who offer detailed documentation and technical support to help simplify the process.